Earlier today I posted a massive panorama from Hong Kong that I took over the weekend. Instead of attaching my panorama process on that post I thought it warranted a completely separate post (mainly so I can link to it from future posts instead of typing it out every time…#lazy). As a reminder, here’s the image.
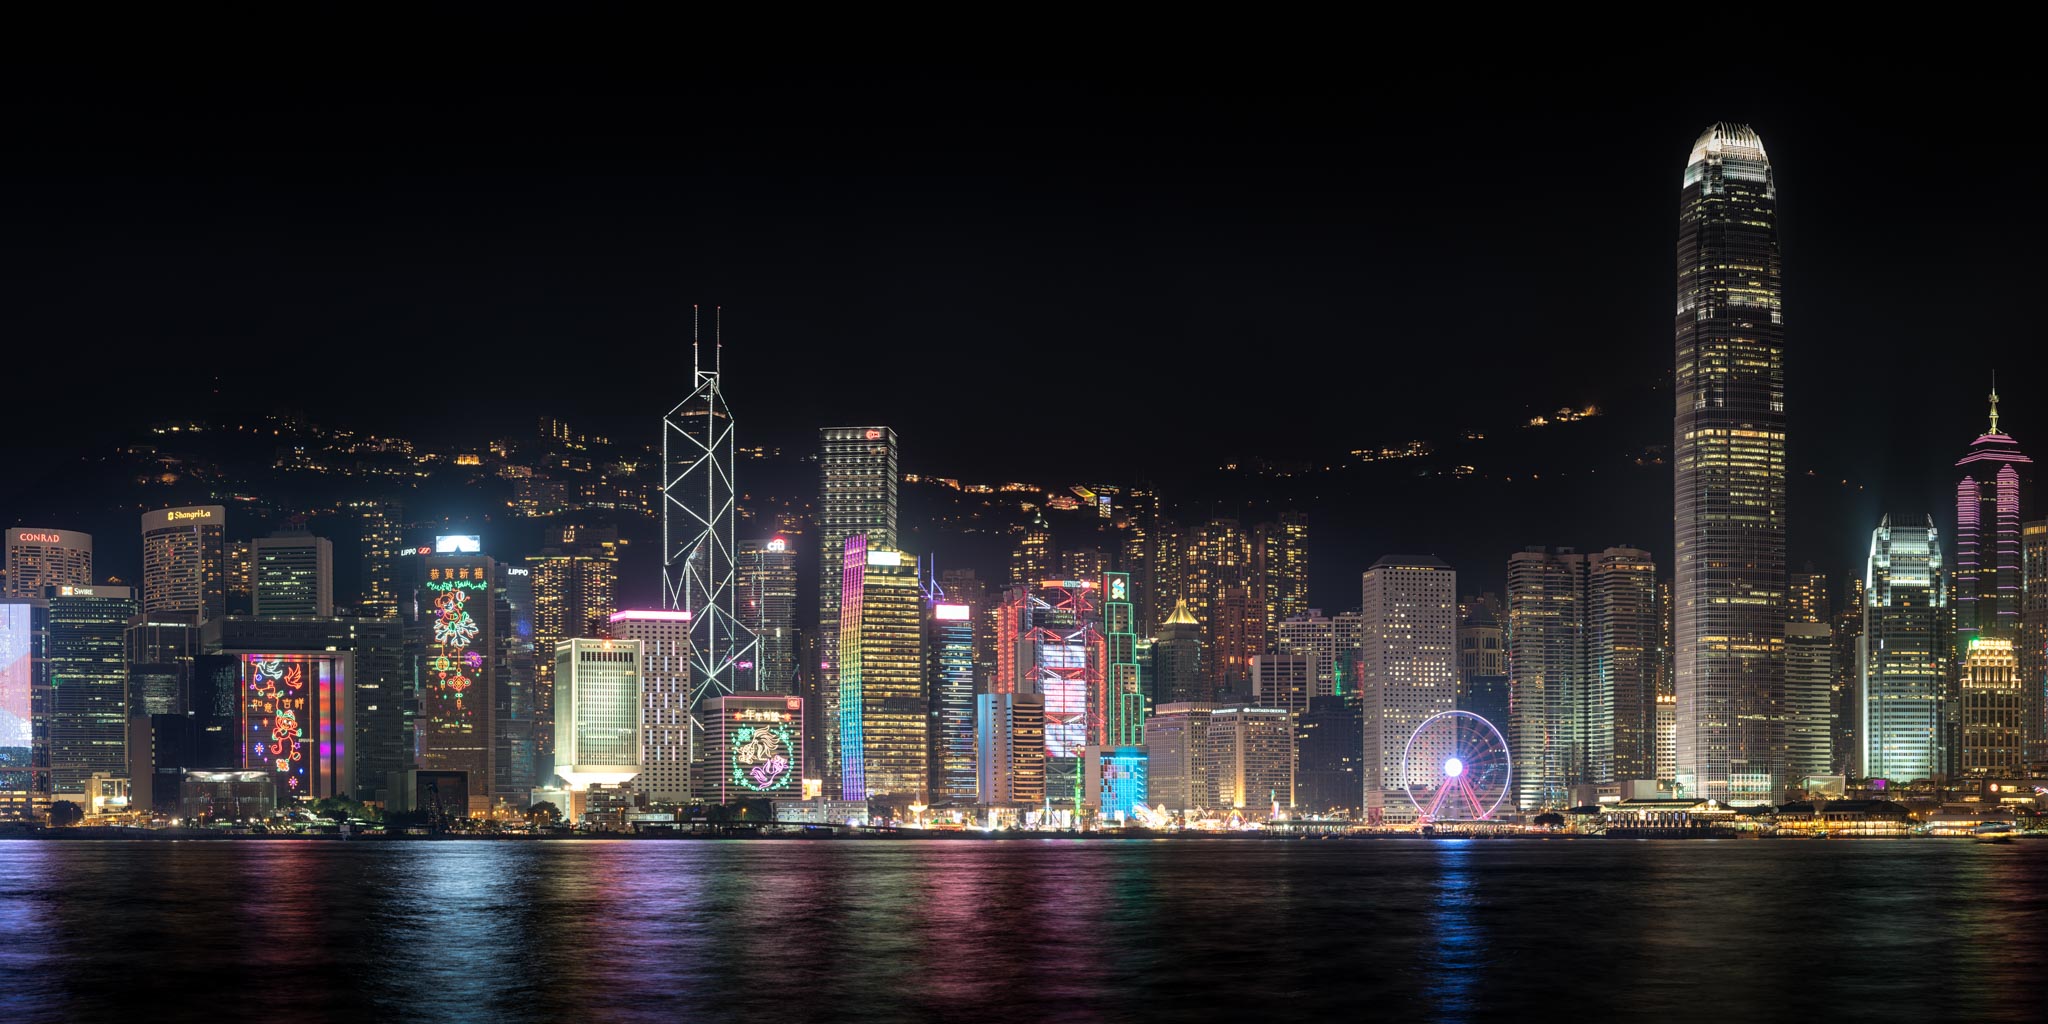
Hong Kong Panorama (not full-size)
To take panoramas I strongly recommend purchasing a pano head for your tripod. I strongly recommend that to myself also but I’ve yet to buy one (the one I want is expensive), so I just use my regular Mefoto Globetrotter tripod head, which works decently well, although a pano head and L bracket are next on my Gear to Buy list. I had my 90mm lens on my Sony a7rII for this pano.
The Process
The process I typically go through (using the above pano as an example) is as follows:
- Position the tripod as level as possible.
- Turn the camera into portrait/vertical orientation. Why vertical if I’m shooting a horizontal scene like this? I need as much room above and below the subject of the image as possible, knowing I’ll lose some of it because I don’t have a pano head for my tripod. If I shoot a vertical panorama I similarly orient the camera horizontally.
- In aperture priority, set the camera to the ISO and aperture (f-stop) that I’d like (in this case, ISO 50 and f8).
- Slowly pan the head of my tripod across the scene and note the exposure time my camera calculates, which will vary throughout the scene. In this case it was reading 5 seconds in the brighter areas and 8 seconds in the darker areas. Knowing that 8 seconds would be way too much for the brighter areas I settled on a 5 second exposure time, knowing I’d be safe across the entire scene.
- Change the camera into Manual mode, set for a 5 second exposure at ISO 50 and f8.
- The Globetrotter has a panning head, which makes the next part easier. Starting on the right, I took an image, panned the tripod left until about 30% of the first image was in the frame, and took another image. I went from one side of the scene to the other, trying to overlap about 30% with each image, and it took 5 shots to cross the skyline (you can do this part handheld as well, just not with long exposures).
- I take the raw files into Lightroom and apply my typical edits to one of the images (I usually pick the brightest image), highlight the other four images, and sync the edits across all five (note: do not apply Lightroom perspective correction before this step).
- Once the files are ready, I highlight them, right-click, and go to the Edit In menu and select Merge to Panorama in Photoshop, or something like that (I do not use Lightroom’s panorama functionality very often, most of the time I just use it to preview how the image looks before sending it to Photoshop).
(Note: if you aren’t comfortable with Photoshop and would like to use Lightroom’s Panorama tool, available in versions 6/CC and later, to accomplish this, skip the next few steps)
- Photoshop will blend the images together. There are other programs that do a better job than Photoshop (PTGui comes highly recommended from others) but I find Photoshop is usually good enough for me.
- Once the images are all set, I’ll flatten the image into a single layer. Some would say to not do this and just make a merged copy of all the layers, but my file sizes are massively large as it is (over a GB before I start adding layers) so I flatten everything out.
- To ensure all of my verticals and horizontals are right I use the Adaptive Wide Angle filter (Filters -> Adaptive Wide Angle). This brings up a dialog box that attempts to adjust the image for me but gives me some powerful manual controls. Lets take the Bank of China building in the panorama above (it’s toward the left, the one with all the white diagonal lines on it). I know the sides of that building are supposed to be vertical. What I do is hold down the Shift key, click on the top of the building, and drag that line to the bottom of the building using the zoom window to the right. You’ll notice the line may bend as you’re dragging it, that’s expected. When I let go of the mouse, the filter will make whatever the line covered completely vertical. I’ll spend 10 minutes or so finding any easy to access vertical lines in the image and make sure they’re adjusted, then try and find an obvious horizontal line (in this case, the shoreline) and do the same thing.
(Note: if you merged the panorama in Lightroom, we’re back!)
- Once I have a good image that has good verticals and horizontals I crop the image to the desired composition. Without a pano head on your tripod you’ll end up losing quite a bit of the images on either end of the image due to the parallax effect. Lightroom has a new feature called Border Warp but I’ve never been a fan of distorting the borders unless absolutely necessary (your mileage may vary, which is fine).
- Once everything is cropped and level I proceed with my typical workflow, usually involving Nik Color Efex Pro 4 and maybe some sharpening on top of that.
- Finally, I post to my favorite travel blog ever 🙂
Still with me?
Whew, that got a little nuts! If nothing else I hope it helps give you aspiring photographers some ideas and opens a door to something you may not have known was possible with the tools you have today. I know it sounds a little complex but it’s pretty easy once you try it a few times, typically the longest part of the process is waiting for Photoshop to take the files from my camera and merge them together (which is why many like the Lightroom function, it works a little quicker).

Awesome! Thanks for sharing your workflow! (Side note: I never thought a pano head would be that expensive…!)